About two months ago I received an email from TotallyRad! Inc, a company known for awesome Photoshop actions and Lightroom presets. They asked me to review their new film presets for Adobe Lightroom – presets that allow photographers quickly and easily edit images so that the final product looks as if it were shot on different types of film.
I am a huge film photography aficionado – I shot film professionally for many years and even when I switched to digital for all of my commercial work I still shoot a ton of film for personal projects. When VSCO came out with Adobe Lightroom presets about two years ago, I was completely blown away. They did an amazing job of replicating all the wonderful tonal properties of different films and crossing the bridge between digital and analog images.
When TotallyRad! asked me to review their new presets, I was very hesitant – while I generally embrace change, I’ve been in love with VSCO film presets for so long, I did not want to try another product. A few weeks ago I finally got enough free time to sit down and play with Replichrome presets for a few hours. Let me tell you, they are pretty damn great.
While VSCO offers separate sets of Lightroom presets specifically calibrated for Nikon and Canon cameras, Replichrome presets are split based on commercial film scanners – Noritsu and Frontier.
I edited a single image using most presets by both VSCO and Replichrome. All Replichrome edits were done using Noritsu presets (since I prefer tonal qualities of that particular scanner). Each pair of images has a Replichrome edit at the top and a VSCO edit on the bottom. Even though both companies offer presets for simulating under- and over-exposure, I edited this image using standard exposure setting. The image was straight out of the camera and edited ONLY using the presets.

Fuji 160C

Fuji 400H

Fuji 800Z
")
Fuji Reala 100 (Replichrome only)
")
Kodak BW 400CN (Replichrome only)

Kodak Portra 160

Kodak Portra 400

Kodak Portra 800

Kodak T-MAX 3200

Kodak Tri-X 400
 I admit it. I am a film addict. I got my first camera in 1985 as a present for my 8th birthday and have been shooting ever since. My introduction to photography had one condition – my mom told me that I would get allowance money for film only if I learned to develop and print it on my own. I spent the next couple of years of my life begging, borrowing and, on one special occasion, stealing darkroom equipment and chemicals. By the time I was 11, I had a fully-stocked darkroom and would spend every free moment tinkering with an antique Soviet-made enlarger and inhaling toxic chemicals in a poorly-ventilated closet (which probably explains a lot about the way I turned out).


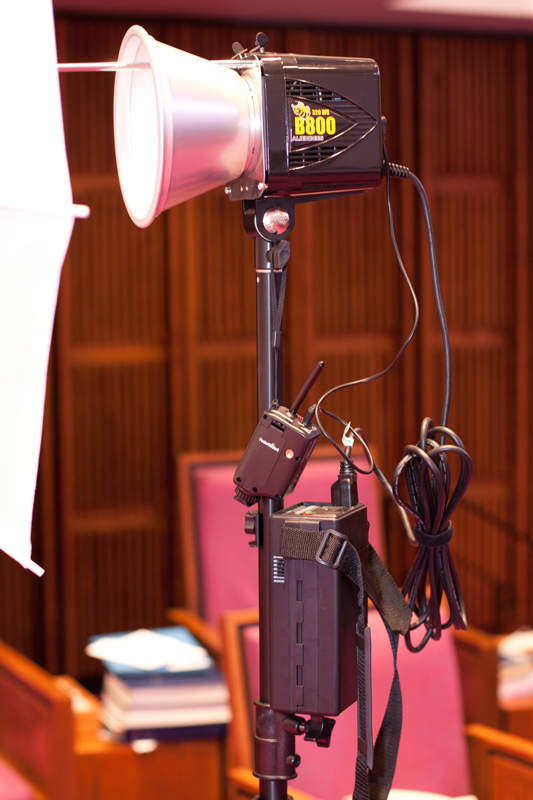
") I am an event photographer, so most of my shoots take place on location. Some locations are great – it is as if they were created with photography in mind. Other locations, not so much… I can never use ugly locations, poor lighting, lack of power outlets and overly strict venue directors as excuses for crappy photos; what a location lacks in light, beauty or power outlets I have to compensate with my skills and equipment. I love using off-camera lighting – it gives me more control over light positions, light output, shadow placement, rations and about a dozen other lighting factors. For large, poorly-lit venues I prefer using my
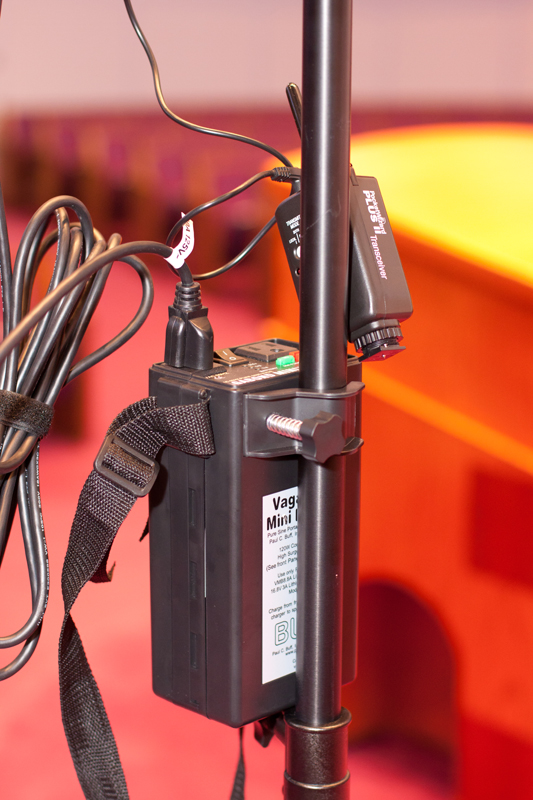
I am an event photographer, so most of my shoots take place on location. Some locations are great – it is as if they were created with photography in mind. Other locations, not so much… I can never use ugly locations, poor lighting, lack of power outlets and overly strict venue directors as excuses for crappy photos; what a location lacks in light, beauty or power outlets I have to compensate with my skills and equipment. I love using off-camera lighting – it gives me more control over light positions, light output, shadow placement, rations and about a dozen other lighting factors. For large, poorly-lit venues I prefer using my  The only negative thing that I can say about this particular battery pack is its lighting stand attachment clip. The Vagabond Mini comes with a plastic clip and a spring-loaded screw that can be used to attach the battery pack to a lighting stand. The plastic clip is only big enough to loop around the thinnest (upper-most) section of a lighting stand. Moreover, the spring itself is a huge hindrance. It is so tight that threading the attachment screw requires a significant amount of force and on one occasion I accidentally knocked over a lighting stand while trying to attach the battery pack. Also, as I said before, the attachment clip is plastic; while the battery pack is not that heavy (a little over three pounds), I always feel very conscious of that fact when moving lighting around. Overall, the Vagabond Mini is an excellent product and as far as battery packs go, it seems to be far better and less expensive than any similar product currently on the market. If you do a lot of on-location shooting, having this little battery pack in your lighting case is an absolute must.